Podcast Interview with Jessa Schifilliti of Love & Light Photographs

The latest episode of Tea with Jainé is now LIVE on our podcast channel. I interview my good friend and fellow wedding photographer Jessa Schifilliti of Love and Light Photographs. We chat about how Jessa started out as a second (sometimes third!) photographer, built her wedding photography business, and successfully implemented an associates photographer program. Jessa talks about defining her brand and finding her signature style. She shares her thoughts about how to network and create authentic relationships inside the wedding industry. To find out more about Jessa and see her wedding photography, visit her online at Love & Light Photographs and @jessalovelight on Instagram! 

You can listen on Apple Podcasts, Spotify, Google Podcasts and many more. Check our our Anchor profile for a full list of available platforms.

Jessa Schifilliti Photography

Want more Tea? One-on-One Coaching is now available! Find out more here!

Stay in the know! Subscribe to our newsletter, podcast, join our facebook group and be sure to follow @jainekershner on Instagram for the latest Tea with Jainé IG TV episode.

Greetabl Discount - Save 20% Greetabl and Greetabl Insider Pro. Use code JKERSHNER at check out.

Interested in collaborating? Please fill out our contact page and say hello!

How to Setup Lightroom Catalog and Useful Keyboard Shortcuts

I wanted to share my best practices when it comes to setting up your Adobe Lightroom Catalog because I think it's very important to start off on the right foot when editing, backup and archiving your photos. Lightroom is an incredible photo editing program that has a ton of features which can become very overwhelming when you are first starting out. I have studied and mastered how I use Lightroom to edit my photos and I wanted to share with you how I prefer to setup my Lightroom Catalogs along with some of my favorite Lightroom Keyboard Shortcuts.

I will preface this post but saying that I wouldn't know anything about Lightroom if it wasn't for Jared Platt's Creative Live course Lightroom 101. I bought that course and watched it 3-4x's in a row to truly understand how to setup my catalog and edit my photos as efficiently as possible. I would highly recommend checking out his catalog of courses on Creative Live. I met him once at WPPI and thanked him for helping me and changing my editing workflow process from top to bottom.

How to Setup Your Lightroom Catalog


No. 1 - Create a NEW catalog for each and every job you photograph. Think of a Lightroom catalog as filing cabinet and your photos are the "files" inside. You want to keep all of the folders and files inside one filing cabinet at a time. If you were to keep all of your photos inside the same catalog, archiving and and keeping track of your "files" (aka. your photos) is going to become a hassle and you could get the dreaded question mark (Folder Missing Icon) inside of your catalog. To keep everything organized, I create a new folder for each client and create the same file set inside their folder which includes a Catalog, Images and Print folder. When I am done organizing, editing and exporting the images and have delivered them to my clients, I will archive them to my backup drives and within time, deleted them from my computer. If I were do this while only using one main catalog, I'm going to have a hard time keep track of all the photos that belong to each job. For me, it's peace of mind knowing that everything is in ONE place and can be easily opened, archived, and worked on anywhere without ever missing important photos. 

No. 2 - Turn on Automatic Backups and Write the XMP data for Each Catalog. After you've created your new catalog you should immediate turn on two important functions of Lightroom every single time.

It seems like a no-brainer but turning on Automatic Backup's every time you quit Lightroom is just a extra level of protection for your files. Sometimes catalog's get corrupted but if you've turned on this feature, you can simply go into your Catalog > Backups Folder and simply unzip the last saved backup and start working as if nothing happened. It's 100% worth turning on and takes only a few seconds to complete once you quit the program.

Open Lightroom > Go to the Lightroom Menu > Catalog Settings > In General Tab > Backup > Choose Every Time Lightroom Exits from the drop down menu.

Lightroom Catalog Setup Tips - Automatic Backups

When you are editing photos inside Lightroom (and hopefully your are shooting in RAW) all of the changes you make to the image don't actually touch the image. What's happening is the data is being written to the "sidecar" file which is the XMP file. The XMP data writes on top of your photo like a piece of vellum. It's only a layer that can be easily removed however, Lightroom doesn't automatically process these changes while you are working. Why? I have no idea so you have to tell the program to do this for you thus saving you time and energy if the program were to crash and you lost all your work. Nobody wants that!

Open Lightroom > Go to the Lightroom Menu > Catalog Settings > In General Tab > Metadata > Check the box next to "Automatically Write Changes to XMP". 

Lightroom Catalog Setup Tips - XMP Data.jpg

No. 3 - Build Your 1:1 Previews for every catalog - I'm sure you've heard of Smart Previews when importing your photos into Lightroom. It renders a faster preview of your image so you can edit faster BUT it's still not the fastest. It can still take time to render each image inside of Lightroom thus slowing down your editing time. Your images can look pixelated until Lightroom catches up and processes the file. I find that when I make the Smart Previews upon import, I still need to build my 1:1 Previews to have my images load instantaneously with absolutely no lag time. 

After your images have been imported successfully into Lightroom, select all the images in the Library Module. Next, go to Library Menu > Previews > Build 1:1 Previews. It will take a while for the previews to load so I will go make myself a cup of tea or respond to emails until the process has completed. Once it's done you are ready to edit your images without any rendering or lag time in editing. FINALLY!!

No. 4 - Keyboard Shortcuts - Oh my goodness, Lightroom has a million shortcuts that will become second nature to you the longer you use the program and sometimes they change them on you without warning, which is the worst! 

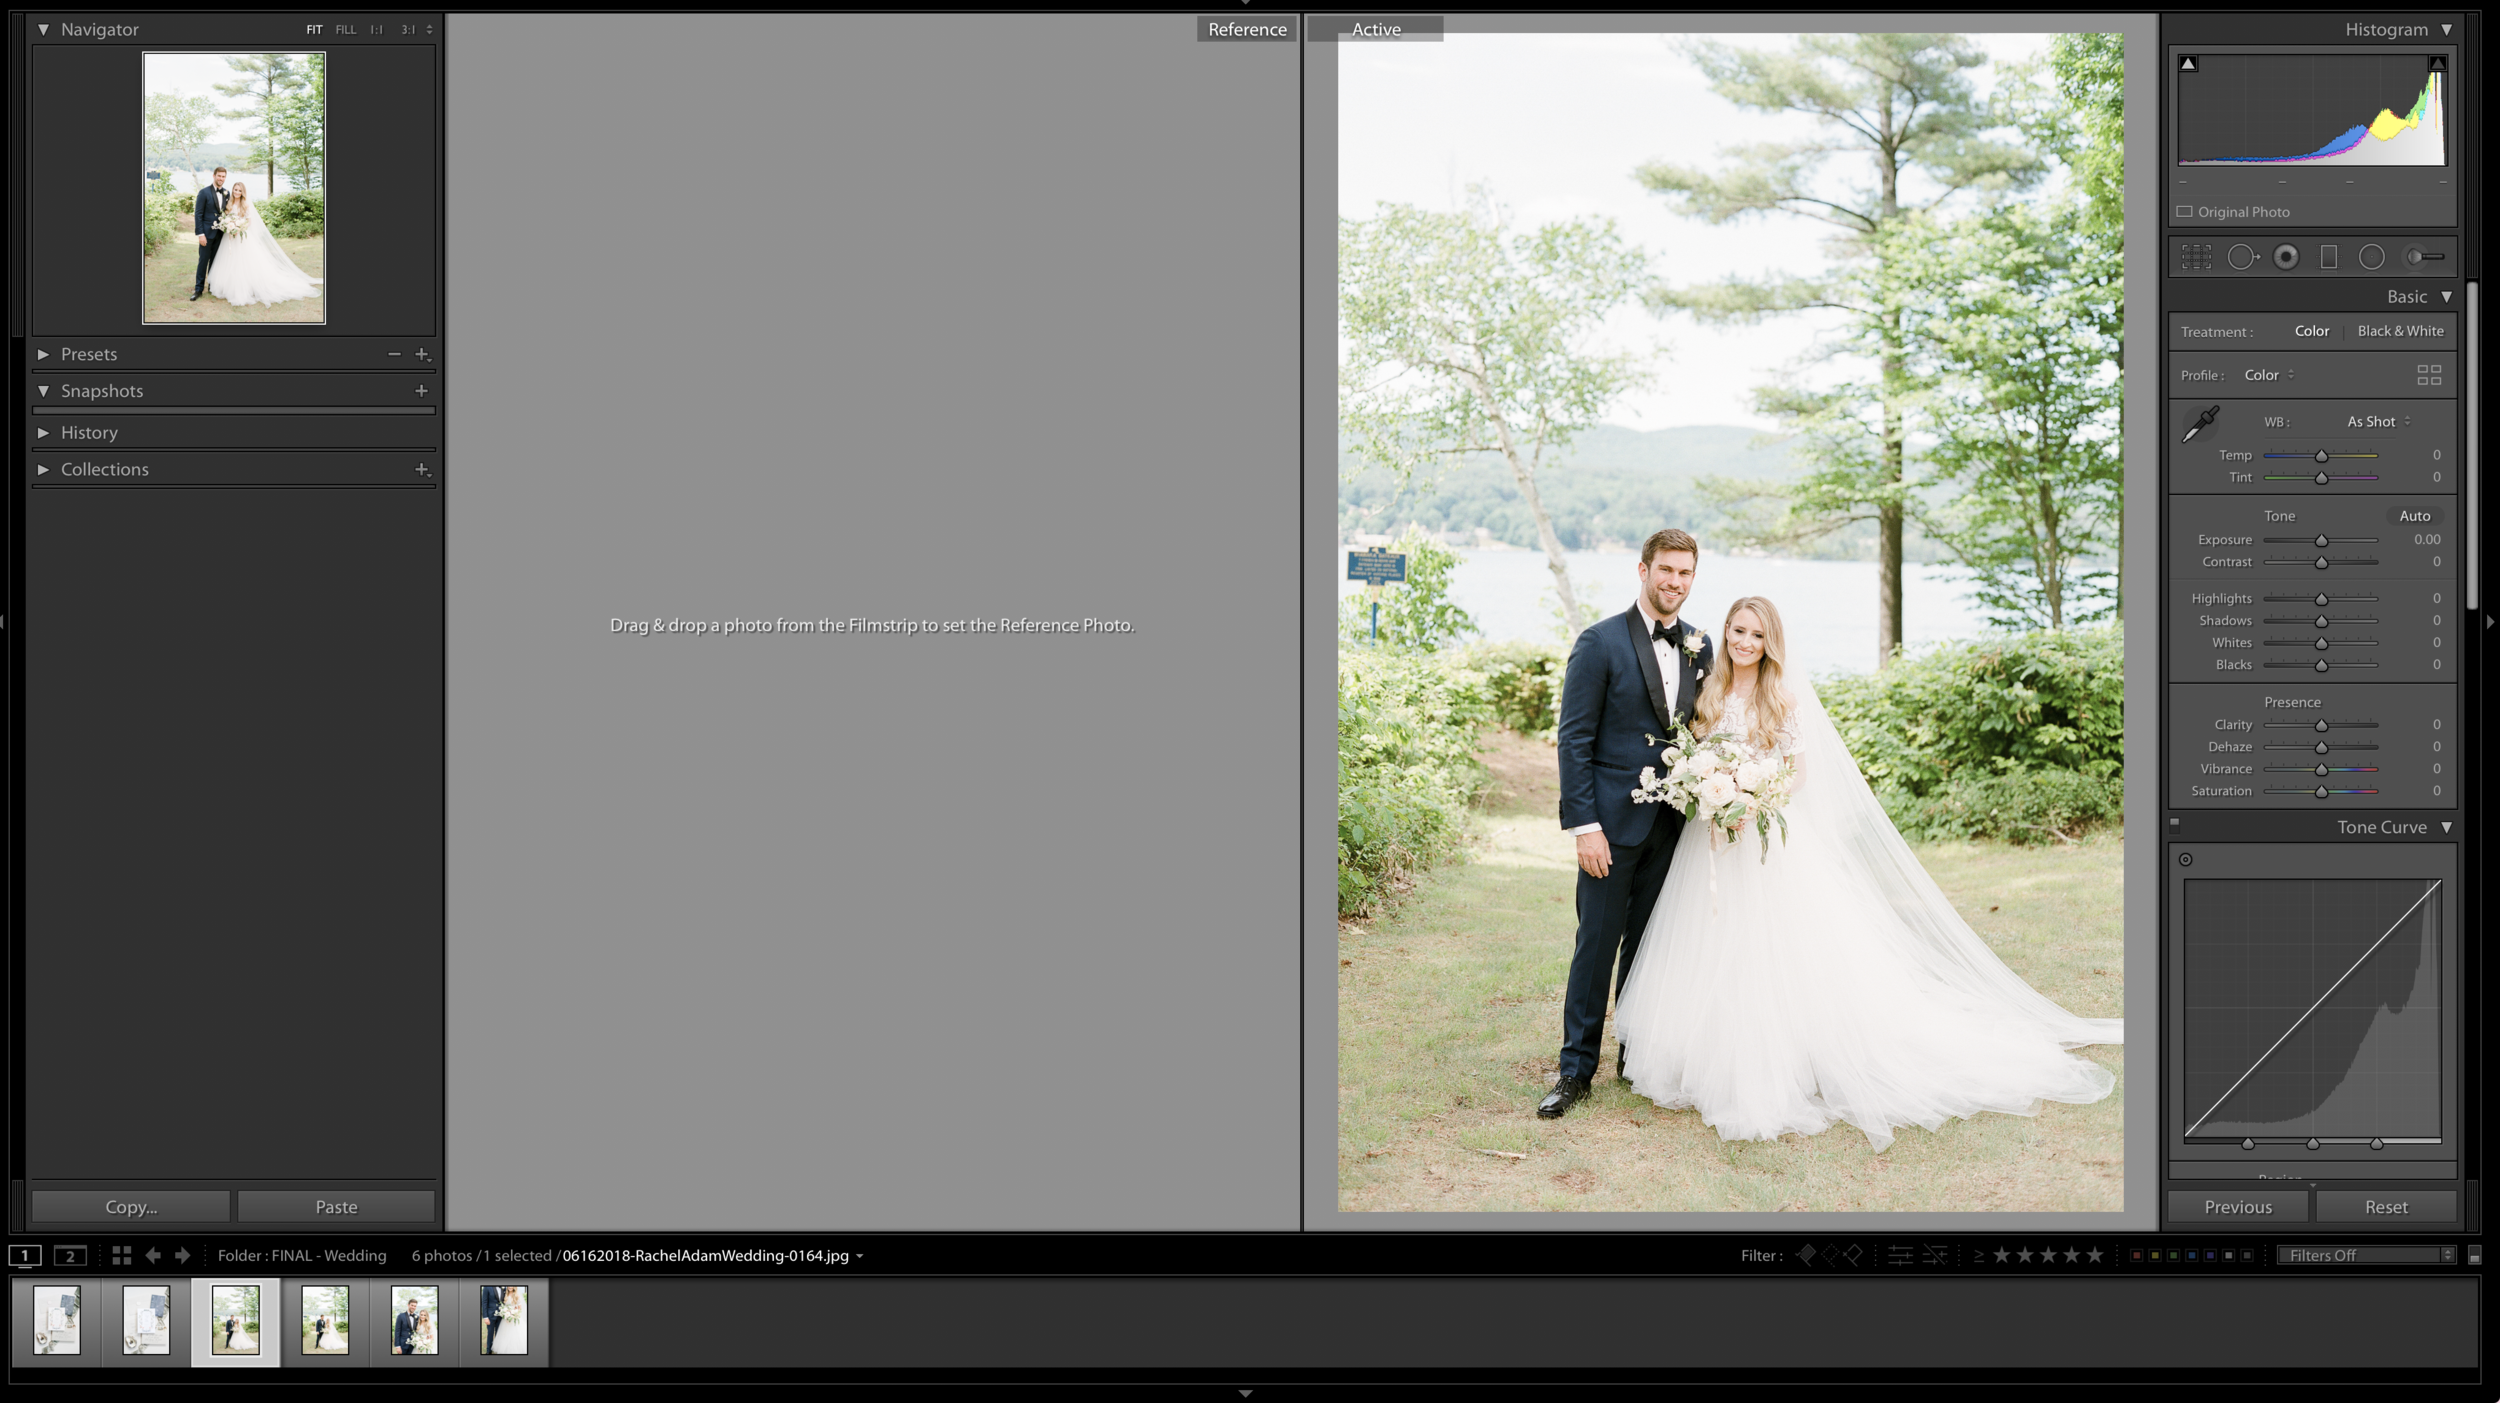
Keyboard Shortcut: SHIFT + R - REFERENCE VIEW
My favorite keyboard shortcut is the Reference View. You must be in the Develop Module (D key) for this to work. The Reference View creates a split screen inside the Develop Module for you to do a SIDE-by-SIDE edit without having to use the pop up window option anymore. Once it's selected, you can drag your Reference photo on the LEFT and on the right, you can edit and toggle between photos to match your REFERENCE image. It never moves until you drag and drop a new REFERENCE image to use. Seriously, it's the BEST shortcut ever for hybrid photographers like myself or anyone looking to match images. 

Lightroom Catalog Setup Tips - REFERENCE View

Keyboard Shortcut: SHIFT + F - FULL SCREEN MODE
I prefer to use my Lightroom screen to it's fullest capacity which means I do not want to see my menu bar (For Mac Users), my dock, the clock or any other apps while I am editing. So I love the SHIFT + F keyboard shortcuts. They allow me to toggle my screen from being able to see my menu bar, to completely hiding it. It's a great shortcut to help you max the screen space that you have.

There you have it! My favorite Lightroom Catalog tips and setup options I use just about everyday. I hope they were helpful and will save you time and peace of mind in the future. What are some of your favorite Lightroom Tips and Tricks? Any keyboard shortcuts you want to share? Please leave them in the comments below!


Want more Tea? One-on-One Coaching is now available! Find out more here!

Stay in the know! Subscribe to our newsletter, podcast, join our facebook group and be sure to follow @jainekershner on Instagram for the latest Tea with Jainé IG TV episode.

Greetabl Discount - Save 20% Greetabl and Greetabl Insider Pro. Use code JKERSHNER at check out.

Interested in collaborating? Please fill out our contact page and say hello!

3 Tips How to Avoid Client Negotiations About Pricing

Over in the Tea with Jainé Facebook group, I received a question about what to do when a potential client starts to negotiate about your prices while you are already in a meeting. Ummmm, can we say awkward? This person had two potential couples start to haggle with her at the very end of their meetings and she was beginning to feel discouraged. She wanted to know if I had any tips to help avoid this from happening again. Boy, do I! This is such a great topic that I recently posted my thoughts over on my Instagram IGTV channel and wanted to follow up with a more in-depth blog post. Here are my top three tips how to avoid awkward client negotiations about your photography prices.

No. 1 - Make Your Wedding Packages SIMPLE - I think the biggest "A-HA" moment for myself was when I started to reflect on what my couples were booking vs. what I was offering. When I first started out, I had several collections with all sorts of options that frankly, were VERY confusing. Every couple wanted something different and I was tired of making "custom collections" so I decided to update my wedding packages to what my couples really wanted and go from there. I created three collections and I made my base collection the minimum I needed to do my job of capturing a wedding from start to finish. This way, there would be no more negotiations about what to "take out" because there was literally nothing to take out. For myself, my base collection will always include 8 hours of photography, a second photographer and the digital files. Once I decided that this was the right formula for me, I built my next two collections on top of this base collection so when someone asks to take out the engagement session or remove the albums, I refer them back to the base collection. I will not remove anything items or services from the base collection because it's the minimum I need to do my job. I wouldn't take a job that wanted me to do less (unless it was a small wedding or elopement which would have separate pricing all together - see my note below). 

So, how do you do this for yourself? I would figure out what is the minimum you need to cover your weddings or events and start from there. It won't be the same as mine but knowing what your base collection is will stop clients haggling over your services because if they can only add-on, they won't be able to take anything away. 

Also, I would recommend having a different collections for the different types of weddings and events you photograph. If you specialize in small weddings and elopements, having different pricing for those types of events will alleviate the frustration of creating smaller collections from your full wedding day services every time someone inquires. If you are a destination wedding photographer, having separate collections for your destination and local weddings is a great way to minimize any type of price negations as well. Only send your potential client the pricing information for their type of event. 

No. 2 - Share Your Prices In Advance - I cannot stress this enough but no one, I mean, NO ONE wants to be surprised especially when it comes to talking about money. They want to know in advance how much your services cost (if not start at) and you should tell them well in advance to ever meeting them in person. As I mentioned in my blog post about Ghosting, one of the biggest reason people ghost you is because they have complete sticker shock. I strongly suggest listing your starting price on your website contact and investment pages. When I first reply to new inquries, I always reiterate my "starting rate" and I ALWAYS send my pricing guide before each phone call.

What should you do? I would create your own process where you will send clients your full collection guide prior to any phone call or meeting so they have time to read and review it. They'll be able to see your wedding packages, prices and be able to ask any questions specifically related to your prices during your meeting or phone call. No more awkward conversations about "asking for a discount" or "what can we do to lower the cost" when you are already in a meeting. Phew!

No. 3 - Get Comfortable With The Word "No" - I know, no one likes to be the bad guy and say "No" to a potential client but to be a successful business person, you have to learn to say the word "No" and for the right reasons. However, with that said, I do have a twist on the way you say "No" without really having to say it. When someone asks for something that I'm not comfortable doing or I don't want to "swap out" to lower the price, I always suggest something else that could possibly be a better solution and benefit both of us. How you ask? Let me explain...

Let's say someone is asking for a discount on an album and I already know that don't offer discounts on albums. How would I answer them? I would say is "Unfortunately, I don't offer discounts on my albums but if you choose to add and album to your collection, I would love to gift you additional spreads as my way of saying Thank You". I'm saying "No" but in a positive way and offering something of value to my client vs. taking money away from my profits. Offering your client something of value such as additional hours of coverage, more pages in their album, an engagement session, etc... is inherently more valuable to them then lowering your prices for your services.

Being able to confidently explain and defend your pricing will lead to less haggling and negotiations during your client phone calls and meetings. I truly believe streamlining your pricing structure for your photography services, being up front with your prices and able to politely (but firmly) say "No" is the best way to avoid awkward negotiations and book the perfect couples just for you.  

What are your thoughts? Have you ever had an awkward conversation about your prices with a potential client? What did you do? I hope these tips were helpful and I'd love to hear from you in the comments below. 


Want more Tea? One-on-One Coaching is now available! Find out more here!

Stay in the know! Subscribe to our newsletter, podcast, join our facebook group and be sure to follow @jainekershner on Instagram for the latest Tea with Jainé IG TV episode.

Greetabl Discount - Save 20% Greetabl and Greetabl Insider Pro. Use code JKERSHNER at check out.

Interested in collaborating? Please fill out our contact page and say hello!

Podcast Interview with Cassi Claire Weddings is LIVE!

We are so excited to have our very first Tea with Jainé Podcast interview LIVE on our channel- HOORAY!! We interviewed our good friend and fellow wedding photographer Cassi Claire of Cassi Claire Weddings. We had so much fun chatting (and laughing!!) about all things wedding photography. Cassi talks about working with your spouse, defining your own version of success and shares her favorite workflow apps and tips. There are SO many good tips that I just know you are going to LOVE it!

Also, the Tea with Jainé Podcast is now on even more podcast networks including Overcast. There are so many great ways to hear Cassi's interview. So grab a cup of tea and happy listening! xo - Jainé

02-CassiClaireWeddings-IGStory.jpg

Want more Tea? One-on-One Coaching is now available! Find out more here!

Stay in the know! Subscribe to our newsletter, podcast, join our facebook group and be sure to follow @jainekershner on Instagram for the latest Tea with Jainé IG TV episode.

Greetabl Discount - Save 20% Greetabl and Greetabl Insider Pro. Use code JKERSHNER at check out.

Interested in collaborating? Please fill out our contact page and say hello!

Tea with Jainé Podcast is LIVE - Subscribe NOW!!

I'm so excited (and a bit nervous) to let you know that the "Tea with Jainé" Podcast is now LIVE!! That's right, we've started a podcast! I wanted a place where I could chat and interview my friends, industry peers and amazing wedding vendors and share their advice directly with you. Everyone has so much to share and this podcast will be another place where you can grow, expand and develop your knowledge. I'm so EXCITED!!!

So, how can you hear the latest episode? You can listen on just about any podcast platform including Anchor, Apple Podcasts, Google Podcasts, Breaker, Castbox, Pocket Casts, Radio Public, Spotify, and Stitcher. I am using Anchor to create and distribute my podcast and it's so easy and free. 

I'd love for you to stop by, listen and hit that subscribe button and if you like what you hear, please leave us a review. It's the best and fastest way for new people to hear our show and discover us online. We'd really appreciate your amazing support and kind feedback!!
 

Tea with Jaine Podcast Cover Art

Want more Tea? One-on-One Coaching is now available! Find out more here!

Stay in the know! Subscribe to our newsletter, podcast, join our facebook group and be sure to follow @jainekershner on Instagram for the latest Tea with Jainé IG TV episode.

Greetabl Discount - Save 20% Greetabl and Greetabl Insider Pro. Use code JKERSHNER at check out.

Interested in collaborating? Please fill out our contact page and say hello!

My Favorite Camera Lenses to Use Throughout a Wedding Day

One of the most common questions I receive is "what lens do you use?" and "what is your favorite lens to use on a wedding day?". I thought that this would be a great topic to discuss on the blog and over on my Instagram IGTV channel. I use several lenses throughout the course of a wedding but I definitely have my favorites and must-have lenses. I've listed each lens below including why I love it and how I use it for each part of the wedding. 

Oh, and I should mention that I do not use zoom lenses. Yep, you read that right. From the compression, higher aperture's and slower speeds just do not work for me in my own wedding photography. I prefer prime lenses for their speed, low light capabilities, and overall sharpness. They are, however, VERY expensive and unfortunately there is no way around the price of prime lens so if you can find a good one used, I say grab it while you can!  I hope its helpful!!

BestLensesForWeddingPhotographers-50mm.jpg

Let's start with my all time ride or die lens - the 50mm 1.4. I absolutely love the 50mm focal length because it's as close to our own eyes as possible. I love that there is no distortion and the perspective is exactly how we see it. It's very flattering on our faces and bodies keeping everything as natural as possible. I have two 50mm's but the one that spends 95% of the time on my camera is the 50mm 1.4 Sigma Art lens for Nikon. This lens is simply the best 50mm out there in my humble opinion. It's unbelievable sharp (which I actually turn down in post-processing) and is a true workhorse. I purchased this lens 3 years ago and it hasn't left my side since! I photograph everything from the details, getting ready, bridal portraits, bride and groom photos, reception details, wedding toast and speeches with this lens. However, when I do get to the reception, I will switch out the heavier Sigma lens for my lighter Nikon 50mm 1.4G. This lens is so small and light that it's perfect for receptions when my back starts to ache from running around all day. This lens has zero distortion or vignetting (dark shading at the corners of the frame) which is exactly why I prefer the 50mm lens to any other. Also, the 1.4 aperture allows me to shoot very wide open and let in a lot of light in low light situations like wedding receptions or sparkler exits. This is hands down my number ONE recommendation for any wedding photographer looking to build their gear kit. It's a must-have, can't live without kind of lens for me!

BestLensesForWeddingPhotographers-35mm.jpg

the 35mm 1.4 Lens is a fantastic wide angle lens that has very minimal to no distortion on the edges of the frame. The 35mm is the perfect lens for those tight hotel rooms or stunning ceremony locations. I will use the 35mm for getting ready photos in small hotel rooms. I always use this lens for clean wide ceremony photos just after the bride and groom have walked down the aisle. This is the perfect time to take a few stunning wide photos of the ceremony space with everyone seated so the couple can remember what it looked like. The 35mm is great for large bridal party shots and always on my camera body for family formals. Especially, the extended family! This lens is great for cocktail hour photos when asking guests to smile for the camera. Last, I will use this lens for the first dance, father-daughter/mother-son dances and speeches/toasts to include more of the reception room in the photos before switching to a tighter lens. When guests are eating, I like to include a few ambient photos of the space so the couple can get a full sense of their wedding venue during their reception. I think it's a nice way to add to more photos into their final wedding gallery. I will put the 35mm away after the last toast and switch it out for a wider, lighter lens. (see below). A less expensive option, would be the 35mm 1.4 Sigma Art Lens for Nikon.

BestLensesForWeddingPhotographers-85mm.jpg

the 85mm 1.4 Lens is a beast! She is perfect for getting in close without being noticed and still has the power and speed of a prime lens. I use the 85mm during my engagement sessions when we are just starting and couples can be a bit nervous. I'll walk away and give them an action to do and capture them from afar so they can start to get comfortable. I like that I can get a close up shot without being directly in front of them. I love this lens for wedding ceremonies and getting close up reactions from family members, the bride and groom and wedding guests during the service. It also produces the prettiest bokeh (blurry background) in the photos. I always use this lens during the reception for couples first dance, parent dances, speeches and toasts. It's just the right compression with no distortion to create a beautiful photos capturing real authentic moments. I will say that it's incredibly HEAVY (all that glass!!) and once the last speech is done, it's put back in my rollie and it's finished for the night.

BestLensesForWeddingPhotographers-105mm.jpg

The 105 Macro 2.8G Lens has just one purpose in my gear collection. It's for ring detail shots and ring shots alone. It's an expensive lens for just one thing (I KNOW!) but it's worth every penny to make those epic ring shots for your couples. I manually focus this lens around f/6.3, f/8, or even f/11 to created a incredible detail shot of the rings. Since it's a macro lens, the compression and depth of field are still extremely low at higher apertures BUT shooting higher lets you get the prongs, diamonds, engravings in focus each and every time. I do manually focus this lens because the autofocus is just a waste on a macro images. I usually get very low to my subject (the rings) and take my time manually focusing my shot. I'm usually sweating at this point during the detail photo process because of all the concentration I have to do to nail the foucs. It's not a pretty sight!!

BestLensesForWeddingPhotographers-28mm.jpg

The 28mm 1.8G Lens is perfect for wedding reception dancing photos! I purchased this lens a few years ago when it was released from Nikon and boy, do I LOVE it! It's so little, light and the perfect wide angel lens for getting in close on the dance floor and capturing all the action. I'm usually in the middle of the dance floor (I have several bruises to prove it!) with the 28mm capturing really fun wide shots from the heart of the party. There is some distortion on the edges of the images but that is to be expected with such a wide lens. I'm ok with this look during the reception but only at the receptions! It's a prime lens which means it's still fast in low light situations (ie. candlelight dinners, receptions) which is exactly why I prefer this lens to a 24-70mm 2.8 Zoom. In my opinion, it's just too slow and doesn't open up wide enough to let in the pretty ambient light I love for my style of photography. My back loves this lens too because it's so light and easy to carry around for several hours during the reception.

BestLensesForWeddingPhotographers-135mm.jpg

The 135mm 2.0 Lens sits in my bag 95% of the time throughout a wedding day. Since I do not use zoom lenses, I needed a lens that had a longer focal point past 85mm but was still sharp enough to create great images. I found this 135mm Lens from Nikon used and it's amazing for ceremonies where I'm not allowed to be in the first few aisles. Some churches have very strict rules about where the photographer and videographers are allowed to be during the actual ceremony, so having this long prime lens in my kit is definitely handy in those less common situations. It's a 2.0 aperture which is just fast enough to let in a lot of light if needed in a dark church or synagogue. Usually, I have already spoken with the facility director and know what my limitations are for the ceremony space, so I already know if I need to dust off this lens and use the day of my wedding. It's a great long prime lens to have "just in case" I need it and I always like to be prepared. I do, however, love when my second photographer has a 70-200mm for the ceremony to get in nice and tight to the Bride and Groom or reactions from the guests. It's a great addition to the couples overall wedding gallery but not a lens I'm going to purchase anytime soon.

And finally, I also use the Black Rapid LensBling Caps on each of my lenses so I can quickly see which lens I'm reaching for inside my Shootsac or Thinktank Rollie. They are so helpful and by the end of the night, I can never find any of my front or rear lens caps. It's the truth!!

So, those are MY favorite lenses. What are yours? I'd love to hear from you jn the comment section below. Am I missing any amazing lens options out there?!


Want more Tea? One-on-One Coaching is now available! Find our more here!

Stay in the know! Subscribe to our newsletter, podcast, join our facebook group and be sure to follow brklynivew on Instagram for the latest Tea with Jainé IG TV episode.

Greetabl Discount - Save 20% Greetabl and Greetabl Insider Pro. Use code BRKLYNVIEW at check out.

Interested in collaborating? Please fill out our contact page and say hello!

How I Backup and Archive My Wedding Photography

I was recently asked by one of my viewers what is my process after the wedding has been photographed. She wanted to know what I do after each wedding and how do I backup and archive my photos, which I thought would be a great topic to discuss. However, I'd like to preface this post with a friendly disclaimer that this is just my way of doing things. There is absolutely no right or wrong way to do something but I would strongly suggest that you have one additional back up somewhere other than your on camera and computer. I'm happy to share my some-what lengthly data backup and archiving process so grab a fresh cup of tea, and get ready to read along!

How-I-Backup-Archive-My-Wedding-Photography.jpg

My Gear:

The most important part about backing up and archiving system starts with what gear you invest your money in. Without reliable gear, it really won't matter how you back it up. This is what I use:

Digital Camera - I have two Nikon D810 cameras in my gear kit at all times. They are identical copies of each other and setup the same way so that if one goes down, I can just pick up the second one and continue photographing my couple without any down time. One of the reasons I purchased the D810 was because it offered Dual Memory Card slots - Compact & SD Flash Memory Cards. I prefer to use the secondary slot as my in-camera backup as it automatically writes a duplicate JPG version of the RAW file that is being written to the primary card. You can set this up to be your "run off" card, duplicate RAW copy and sort forth. There are a few setup options and this just happens to be the best for me because if anything happens to my Compact Flash card (RAW) I will have already have a duplicate copy (JPG) on my SD Flash card. 

Compact Flash Cards - The ONLY brand I use is SanDisk for my memory cards. They actually invented the technology so why not stick with the best, right? I purchase a few new Compact and SD Flash cards every year and retire cards at the beginning of every wedding season. I label each new card with their purchase year so I can easily see which ones need to be discarded.

Card Reader - I have two card readers - Lexar USB 3.0 and the EC Technologies Card Reader in Rose Gold (which I keep out on my desk and use the most). The Lexar is a bit faster than the EC Tech but that's ok with me because well, it's just prettier.

Hard Drives - Western Digital is my favorite brand for portable hard drives. I've been using them for as long as I can remember and (knock on wood) I've never ever had a problem. My preferred model is the Western Digital Passport 3.0 USB because it's so light, compact and well designed. I purchase 2-3 per year and rotate them throughout my entire backup process.

My Backup and Archiving Process:

Import, Sort and Copy:
After my wedding or session, I import my photos using Photo Mechanic. Once the import process is completed, I will sort by Capture Time and then Rename the photos to be in the correct order. I will do this for my own photos as well as my second photographers. Next, I copy the Photo Ingested folder (a Photo Mechanic term) and copy it to my RAW FILES hard drive. I like to keep a clean, untouched copy of the RAW files in case of any data corruption once my editing begins on my computer. I keep the RAW files for a certain amount of time and then replace the data on the drives.

Culling & Backing Up:
A few days after the wedding, I will sit down and cull the images to a smaller more manageable amount of files. I will create the couples folder layout and copy the selects to their images folder. Next, I will copy their folder to TWO hard drives (Backup A and Backup B) that are exact duplicates of each other. This way, I have two working backups of their images and complete working Lightroom Catalogue at any moment in time. Each week I will go through my working files and copy the new data to each of these two hard drives. How do I know what I'm working on? I label my "in progress" folders in Green and my "completed" folder in Red. You could use Carbon Copy Cloner to do the same exact thing. Finally, I will copy the FINAL folder one last time to the hard drives for safe keeping.

Uploading and Delivery:
Once the images are completed, I will upload them to my online hosting provider and deliver the final images to my clients. They receive the high resolution jpg images with all of their collections. Their images are hosted anywhere from 90 days to a year and each receive a 30 day reminder that their gallery is about to expire. As soon as I deliver their gallery, it becomes my couples responsibility to archive and back up their images. After their gallery expires, I move their folder into my online archives which gives me another yet another backup of the final images. If a past client contacts me because they lost their images, there is a fee to reinstate their gallery.

Backing Up My Computer:
I am a Macintosh user and use Apple's built-in backup software called TimeMachine. I run this once a week to have a complete backup of my computer on a separate Western Digital Passport hard drive. In the rare chance my computer were to fail, I could buy a new machine and install the latest version of my TimeMachine backup and could (potentially) have little to no downtime. I always like to be prepared for the worst!

Offsite Archiving:
The last and final step to my backup process is to physically take my hard drives off site to my safety deposit box at my bank. I like to have at least one hard copy some place other than my home just in-case of theft or fire. But, if the bank burns down, there isn't much I can do about that now, right? So I like having my online and off-site archives to work together.


Want more Tea? One-on-One Coaching is now available! Find out more here!

Stay in the know! Subscribe to our newsletter, podcast, join our facebook group and be sure to follow @jainekershner on Instagram for the latest Tea with Jainé IG TV episode.

Greetabl Discount - Save 20% Greetabl and Greetabl Insider Pro. Use code JKERSHNER at check out.

Interested in collaborating? Please fill out our contact page and say hello!