What's in My Camera Bag for Every Wedding

As I was preparing for my first wedding of the season, I thought it would be a good idea to show you exactly what I carry and wear to every one of my weddings. These are things that over the years as a wedding photographer, I know I need to function and work efficiently throughout the course of the day. These are simply my must have tools and I hope you find these tips helpful!

What's In My Camera Bag for Every Wedding

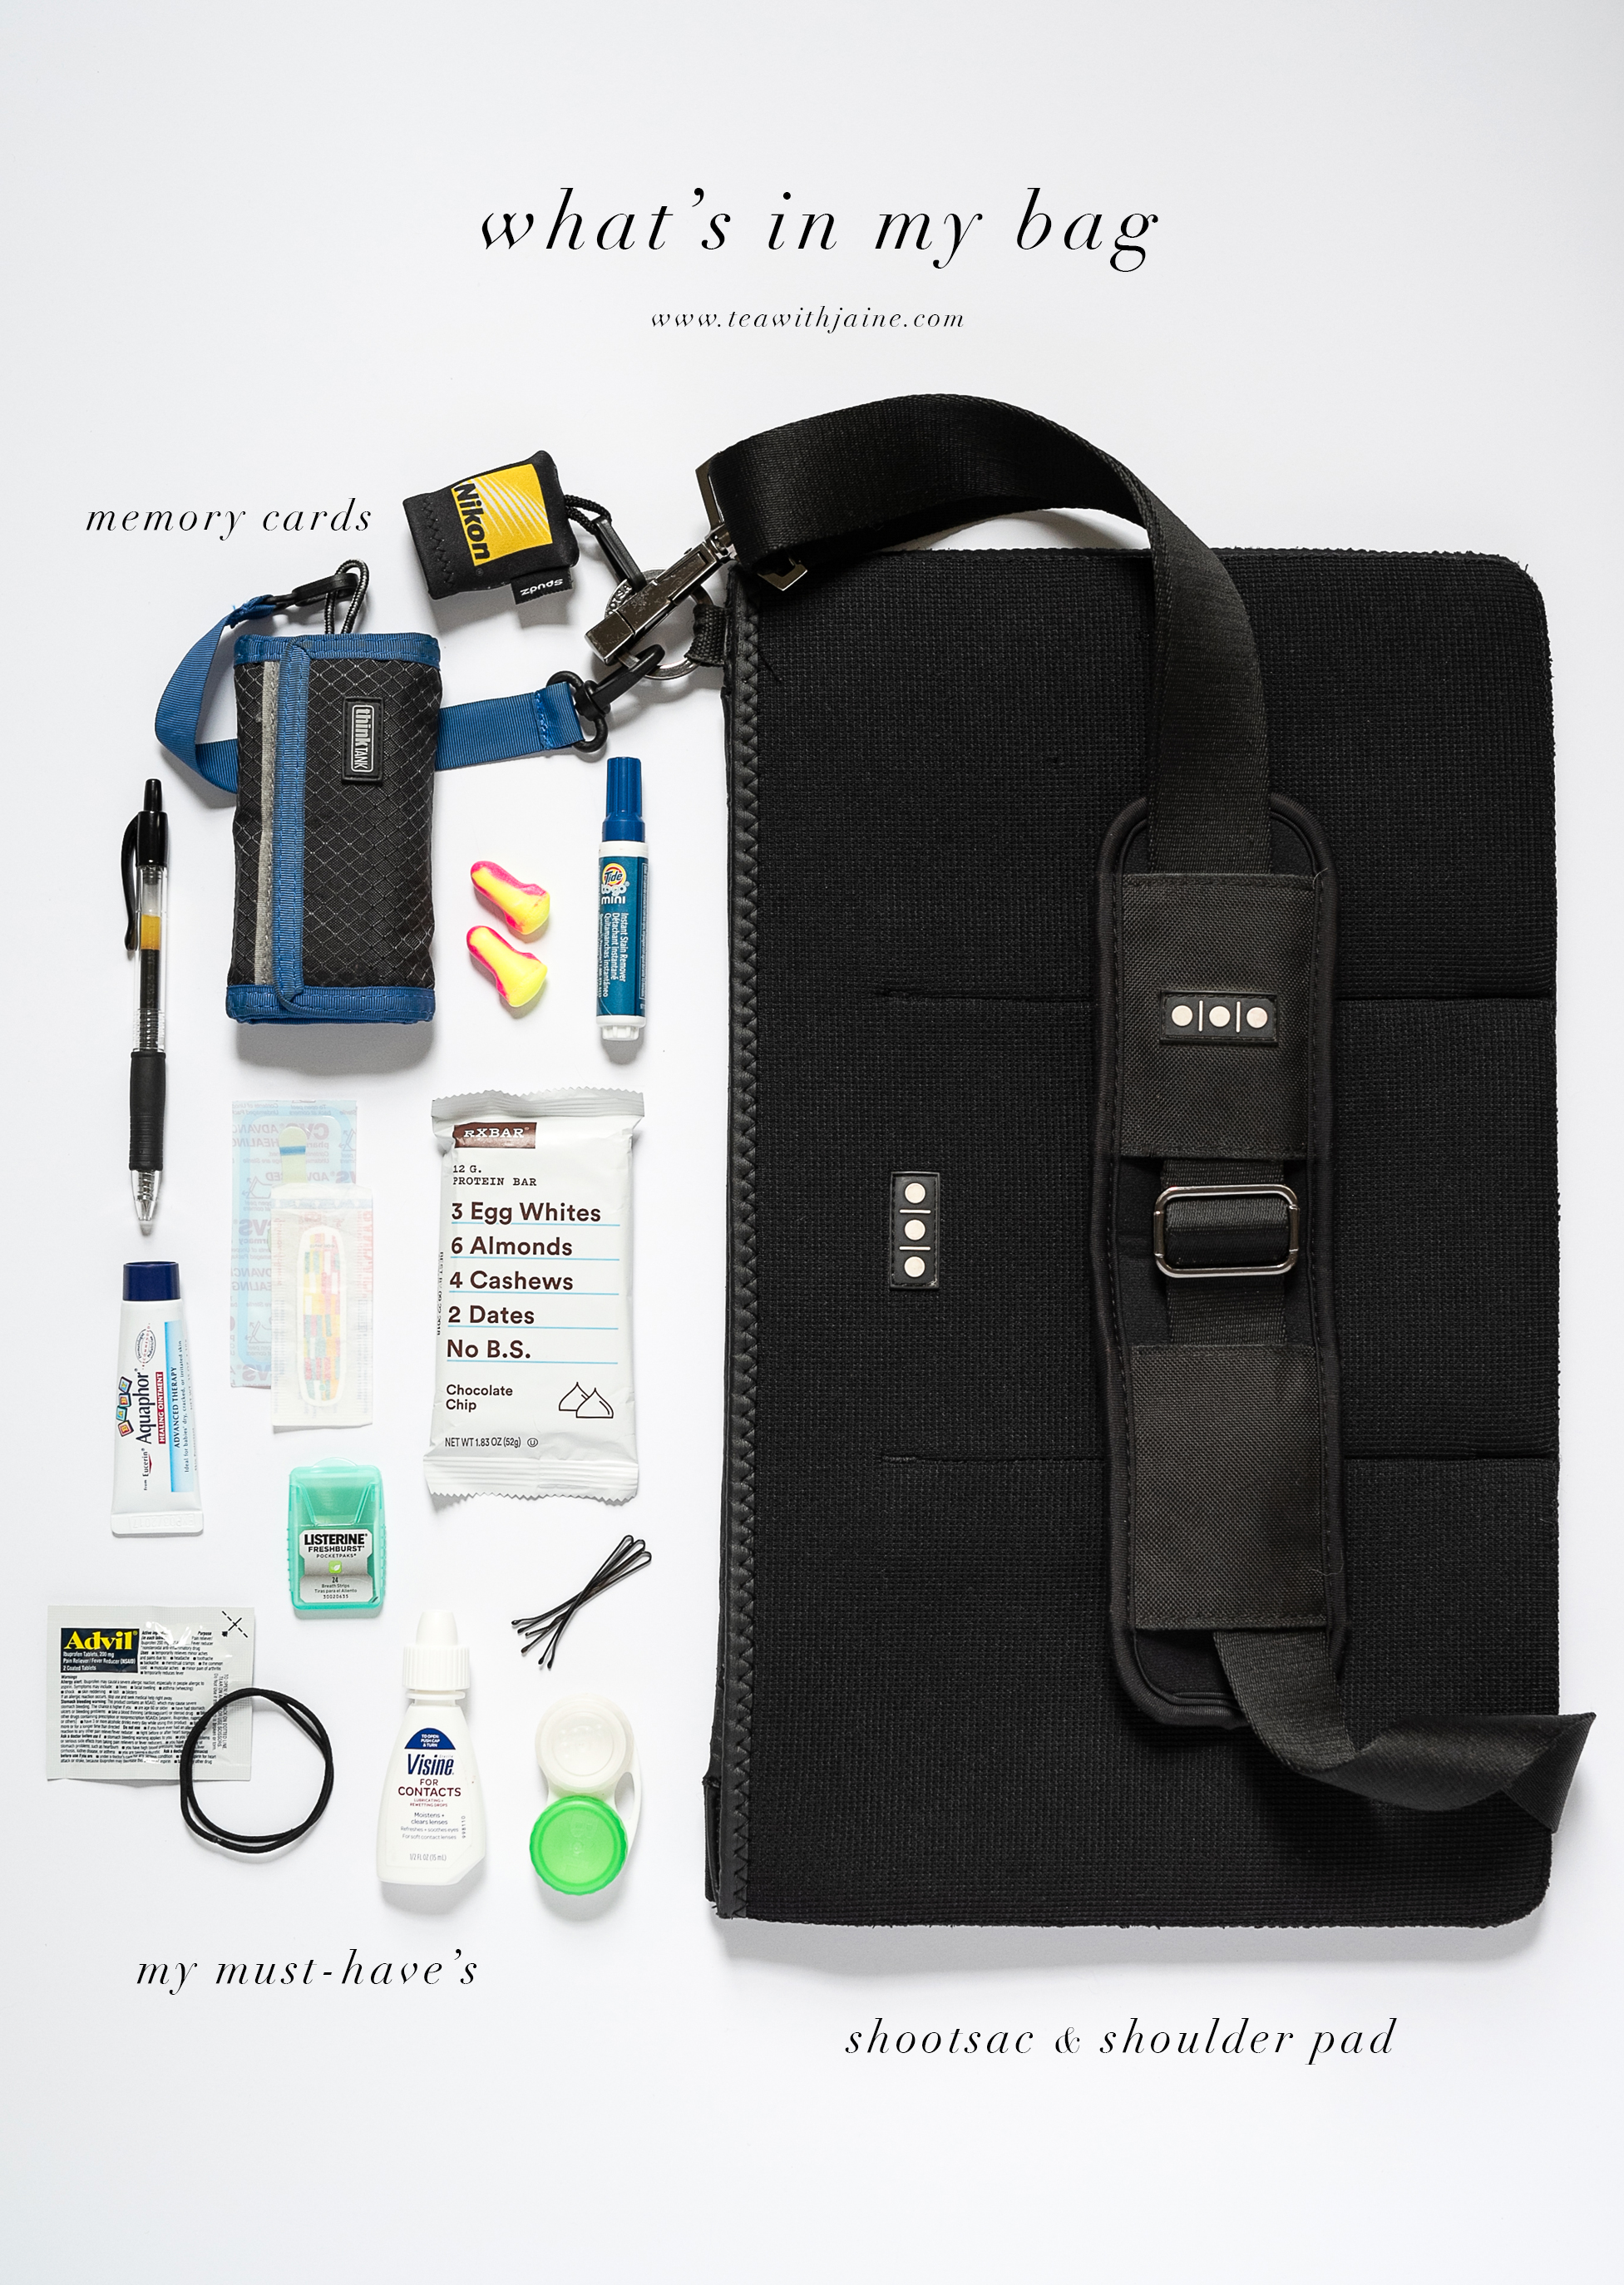
1 - Shootsac Lens Bag and Shoulder Pad - I absolutely could not function without my crossbody camera bag. It carries my lenses, batteries, memory cards, lip balm and much more... I've had a Shootsac from the very beginning of my wedding career and highly recommend it. It's made from scuba material so it's very soft and comfortable on your body. There are six pockets (3 on each side) that allow me to carry all of my gear. I usually will have 3 lenses on me - two in the Shootsac and the one on my camera - at all times. I also created a system by dedicating specific items to certain pockets because it can also become a "black hole" where everything and anything will get lost :) I would strongly suggest buying the additional Shoulder Pad to keep the bag comfortable on your shoulders throughout the day. The crossbody strap is adjustable and I wear it at hip height to easily switch out my lenses and grab my memory cards. If anything, this is my MUST HAVE item for every single wedding photographer out there.

2 - Memory Card Holder - I always have my memory cards on my person the entire course of the wedding. I never want them to get out of my site and chance being lost or stolen. I bought one a Think Tank Pocket Rocket to clip securely on to my Shootsac and I can easily pull out the pouch and switch cards in a hurry. 

Quick Tip: Every time I change my memory card in my card pouch, I turn it backwards before tucking it away in the pocket. This way, I can visually see that it's been shot on and will reach for another card when I'm in a hurry which is all of the time on a wedding day!

3 - Lens Cloth Clip - I like to keep a lens cloth on me at all times and love this clip on lens cloth from Nikon. I also use the Zeiss disposable lens wipes (not pictured) throughout the day. I usually by a box each of 100 each wedding season.

4 - Extra Batteries for my Camera & Flash (not pictured) - I use the Storacell Battery Caddy to organize and store my AAA batteries. These great plastic caddy's hold my loose batteries all in one spot. I put one in my bag at the start of each reception just incase my flash dies in the middle of the dance floor. I also keep an extra set of batteries for my digital and film camera's in my Shootsac as well. You never want to be in the middle of session or important moment and have your camera turn off because you are out of power. I always like to be prepared!

5 - Portable Phone Charger (not pictured) - It's no secret that I like to story on my Instagram (hey, this is how all of this happened, right?) so I carry a small portable iPhone charger. I like this Anker Portable Phone Charger in white. Also, I feel as if you can never find a power outlet inside the reception venue so it's a good idea to have your own.

5 - Ear Plugs - I started wearing earplugs during receptions because I damaged my right ear at a wedding several years ago. I walked past a huge speaker during the ceremony and caught a loud sharp sound in my ear resulting in a damaged ear drum. I had to go to the Dr.'s and after a few tests, he said my ear drum was damaged and would heal on its own. I had a bit of vertigo for almost a year but it eventually went away. Now I always wear earplugs and have several pairs on me at all times.

6 - Protein Bars - I always say photographing a wedding is like running the marathon. You need to keep your energy up! I recently discovered RxBars and I'm in love with them. They have very few natural ingredients and are super yummy. The sea salt chocolate are my favorite (not pictured because I ate the last one!!)

7 - Wedding Photography Timeline & Pen - I always have a printed copy and working pen on me throughout the day. This also helps get through family photos very quickly because I can start right away since I already have the list on me. Smart!!

8 - Everyday Necessities (the must have's) - Bobby Pins, Band-aids, Breath Mints, Advil, Contact Lens Solution and container, Tide-to-Go Pen, Hair Ties, and LIP BALM. I seriously could not photograph a wedding without lip balm :) 


Want more Tea? One-on-One Coaching is now available! Find out more here!

Stay in the know! Subscribe to our newsletter, podcast, join our facebook group and be sure to follow @jainekershner on Instagram for the latest Tea with Jainé IG TV episode.

Greetabl Discount - Save 20% Greetabl and Greetabl Insider Pro. Use code JKERSHNER at check out.

Interested in collaborating? Please fill out our contact page and say hello!

Pros and Cons of Outsourcing Your Photo Editing

I recently received a question from Instagram about outsourcing their wedding photos with an outside digital editor. What did I think about it and would I recommend it? Well, there are definitely pros and cons to outsourcing your digital editing but I think overall, it's a smart investment for any wedding photographer who wants to maximize their time working in the field, meeting new clients and networking with vendors.

For myself, I put off finding a outside digital editor for a long, long time. Originally, I thought I would be giving up control of my photography and it would some how make me less of a professional photographer if I didn't edit my own photos. But then I found out I was having a baby and that perspective changed real quick!! I could no longer sit at my computer for hours anymore because I physically couldn't do it! I realized that I needed help and a digital editor was going to be the best option for me to continue to run my business with the same level of customer service post baby. Honestly, looking back, it was one of the best decisions I have ever made about my wedding photography business and I wish I would have done it much sooner.

As I began my search, I tried a full service editing house that was recommended by a friend. This type of editing service employs lots of digital editors who rotate through jobs and edit your work. After receiving my completed galleries, I soon realized that I wasn't happy with my end results. Unfortunately, I wasn't getting consistent results and had to re-edit my wedding catalog, which defeats the entire purpose of hiring someone else to do it for you. Next, I contacted a boutique wedding editor who works with a small number of clients each year and could give me one-on-one attention. After many consultations about my style, I decided to part ways with my new editor because things just weren't working out. I constantly had to re-edit my weddings which became very frustrating.  So, I began my search once again and this time I looked for someone who specialized in matching digital to film photography. Since I am a hybrid shooter, this is what really matters most to me. Someone who is OBSESSED with color matching as much as I am and I'm happy to say that I finally found the right match - HOORAY!! It took roughly 2-3 weddings for us to figure out our groove, but now my final lightroom catalogues come back perfect and I barely have to touch them. Of course I still do a final review of the gallery, make my black and white selects prior to exporting and delivering my images to my couple. I always cull and put my catalogues together before sending them out for editing. As the photographer, I know the order of events always recommend that the photographers cull their own images. I would never outsource that out to anyone. However, 0utsourcing my digital editing has been a HUGE benefit and overall time saver for myself and my business.

Pros vs. Cons

Pro - Time is Money - We've all heard the saying but it's true. Before I had a baby, I had a lot of time to edit my wedding photos on my own but after my daughter was born, that all changed. I was now paying for childcare and sitting at my desk for hours so I could edit my weddings was clearly the wrong investment for me. Outsourcing was the best solution for me and even thought it was another financial investment, I gained more time to focus on my clients, booking new weddings, marketing, meeting potential and current couples, taking more photography jobs and networking with vendors. This is a biggest pro because the time I would have spent editing, I can now grow and expand my business.

Con - It's Expensive - The biggest con is that it's expensive. It can cost you anywhere from .29 to .39 an image and if you have a large gallery, it adds up very quickly. Of course you can find someone who will charge you less but they might be as good, so be sure to do your research and ask for recommendations. 

Con - Finding the Right Person Takes Time - Just like finding your mate, it can take a lot of time to find the right digital editor for you. You might have to do a few trials with several different editing houses or boutique editors till you find the right match. 

Con - Fixing Your Work - Of course it's a bummer but it happens. If you send out your wedding gallery and it comes back less than stellar, you are going to have to still sit down to re-edit and fix your photos. If your editor doesn't offer re-edits, this is a waste of time and money for you. 

Outsourcing Resource Guide:

Editing House:
Shoot Dot Edit - http://shootdotedit.com/
Raw Digital Film Lab - http://rawdigitallab.com/

Boutique Editors:
Edit Source - https://edit-source.com/
Edited By Artists - https://editedbyartists.com/


Want more Tea? One-on-One Coaching is now available! Find out more here!

Stay in the know! Subscribe to our newsletter, podcast, join our facebook group and be sure to follow @jainekershner on Instagram for the latest Tea with Jainé IG TV episode.

Greetabl Discount - Save 20% Greetabl and Greetabl Insider Pro. Use code JKERSHNER at check out.

Interested in collaborating? Please fill out our contact page and say hello!

How to Plan Your Wedding Photography Timeline

As a wedding photographer, one of the best things you can do to ensure your couples get the most photos out of their wedding day is help plan their wedding photography timeline. Your experience and thoughtful insight are invaluable assets to your couples. Mostly likely, this isn't your first wedding and for your couple, it probably is, so they are looking to you for guidance and advice. I wanted to share with you how I help each and every one of my couples plan their wedding photography timeline with or without a planner. 

HowToPlanWeddingPhotographyTimeline.jpg

No. 1 - Educate Your Couples - Approximately 90 days before each wedding, I send all of my couples my "Tips for Your Wedding Day" email and a link to fill out my Wedding Prep Questionnaire online via 17 Hats. I include a list of my recommended timing for their wedding day and request detailed information about their wedding inside my questionnaire. Giving them this information 90 days in advance gives us enough time to plan accordingly and make any timeline modifications and overall photography coverage. Below is what I usually suggest for each part of the wedding day. 

// 1.5 hour for details & getting ready photos *not always possible, but I request it
// 30 mins for final prep & getting into the dress
// 1 hour for First Look (15 mins), Bride & Groom (45 mins)
// 30 minutes for Bridal Party photos *depending on size
// 30 minutes for Family photos *depending on size

No 2 - Create the Photography Timeline -  Once my couple completes their wedding prep questionnaire, I create their wedding photography timeline first draft. This is a complete breakdown of their wedding day from start to finish including their locations and photography requests for the day. With a well organized document, my couple can visually see how the day is scheduled and make timeline adjustments if necessary. For instance, if they have a lot of family photos requests, some couples might opt to move some pairings to cocktail hour or their even their reception to save some time during the beginning of the day.

Quick Tip: Be sure to include the travel time to each location. From the hotel, to the First Look, to Ceremony to Reception Venue. It all adds up and can eat up a lot of their wedding photography coverage which sometimes get lost when wedding planning.

No 3 - Work with the Planner (*if they have one) - If your couple has hired a wedding planner, I highly recommend introducing yourself and saying how excited you are to work with them. Next, I would send them your wedding photography timeline draft and coordinate with their master timeline. Wedding planners are scheduling the wedding day from start to finish and know all the little details that maybe your couple hasn't shared with you just yet. Having great communication with the wedding planner is so helpful for you, the photographer, and the couple to ensure get they get the best photos on their wedding day.

No. 4 - Plan for the Season and Sunsets - Another great tip is to plan for the season and sunset on your couples wedding day. With a quick google search you can find out when the sun is scheduled to set on their wedding day. Winter weddings usually means less light and Summer weddings have longer days with lots of sunlight. Letting your couple know when the sunset will occur is helpful in planning their ceremony start time and taking photos outside before it gets dark, especially if you prefer to photograph your couple in as much natural light as possible.

Everyone wants great wedding photos on their special day and being organized is the first step in ensuring a happy outcome for each and every one of your couples!


Want more Tea? One-on-One Coaching is now available! Find out more here!

Stay in the know! Subscribe to our newsletter, podcast, join our facebook group and be sure to follow @jainekershner on Instagram for the latest Tea with Jainé IG TV episode.

Greetabl Discount - Save 20% Greetabl and Greetabl Insider Pro. Use code JKERSHNER at check out.

Interested in collaborating? Please fill out our contact page and say hello!

My Wedding Detail Styling Kit

Within the first few years of my business, I realized that I wanted to create beautiful detail photos for my clients without having to rely solely on their getting ready location. Hotels can range from gorgeous to hideous, apartments can be messy or cluttered, and I wanted a way to guarantee pretty flat lay photos for each and every one of my couples independent of my location. My photography is light, bright and airy and dark details photos do not reflect my photographic style, which in turn, didn’t feel like me. So I decided to try something new, I brought a roll of pretty wrapping paper to use as a backdrop to photograph my brides details the morning of her wedding. I was so happy with the results that my styling kit was officially born! I started out with just sheets of pretty wrapping paper but soon upgraded to double sided styling boards. I invested in pretty ribbon, ring boxes, vintage stamps and small bowls to help tell my bride & grooms story without putting too much of my own items into the photos. I always try to use items that are important to my couple before reaching for my styling items. However, if you are in a pinch and want to make some magic out of nothing, it's nice to be prepared! Also, taking the time to photograph your couples details is not only is a wonderful service to them, but it also a great way to get your work published. Editors pay attention to the details and having beautifully styled flat lays can definitely help get you noticed and published. It's taken me several years of purchasing, collecting and refining my styling kit to where it is today and I'm excited to share my favorite styling items and tips with you!

Wedding-Photographers-Detail-Styling-Kit-Essentials.jpg

Styling Objects & Props

1 - Styling Boards - These were my first big investment for my styling kit. I purchased a few double sided linen surfaces from Heirloom Bindery. At the time, they were the only company offering these boards but now there are a few more options out there such as Lux BinderyThe Styling Mat, and Locust Collection. The styling boards can be a pain to carry around during the wedding until you get to the reception but they make the world of difference for my detail photos. I coordinate the colors with the brides details and theme so I know in advance which color board to bring. It comes with a travel bag so I can easily throw it in over my shoulder and know it will not get dirty. It's perfect for the bride's shoes, veil, rings, invitation suite, jewelry and so much more. Once I started incorporating these into my weddings, I saw immediate results and could create stunning details photos in ANY location. My brides are always excited when I setup my board and create a unique detail photo just for them!

2 - Ring Boxes - One of the more tricker items to photograph is usually your couple rings including your brides engagement ring, the wedding bands and any additional heirloom rings. I love to style them on the invites or on a crystal encrusted handbag or belt but I love the idea of having a pretty colored ring box also show of the rings. The Mrs. Box is my go to resource for beautiful colored ring boxes. They are made of vintage velvet and have a rainbow of colors and sizes to choose from. My second favorite ring boxes are from Amonie. They are round, made of velvet and the customer service is amazing! Another, newer company I want to try is Voeu Du Coeur boxes - they are hexagon's. You can also check Etsy for vintage boxes and less expensive velvet boxes. Oh, and I would recommend signing up for The Mrs. Box  & Amonie email lists as they have sales throughout the year and that is when I purchase my boxes!

3 - Ribbon - Oh how I love playing and styling ribbon! I try to use a color close to the brides bouquet ribbon or coordinate with her wedding invitation suite. A few of my favorite online shops are: Frou Frou Chic, Tono + Co, Poetry of Silk, and you can browse for hours at M+J Trimming in New York City.

4 - Small Dishes - This is a new styling item for me. I've wanted to find the prefect small vessel for rings, stamps, earrings and I absolutely love Marbella Dish. Their small dishes are just the right touch of feminine to any detail photo. I also just discovered Simple Things Ceramics and love their three dish choices. I purchased the white dish trio. They are hand made to order and take up to six weeks to arrive.

5 - Vintage Stamps - If you visit Esty and search for "vintage stamps" you will find a ton of great sellers and shops. However, if you live in New York City, you can visit Champion Stamp Company and browse thousands of vintage stamps in person. It's so fun!! I always ask my couples for a few extra stamps from their wedding invitations but if they don't have any extra's, and the stamps I own make sense with their suite, I will use them in the photo.

Even more.... You can add additional styling items to your kit such as scissors, floral sheers, silk table linens, wrapping paper (which is what I started with by Rifle Paper Co.) and much more but I would urge you not to spend too much money on styling items and focus more on the bride and groom actual details vs. creating an image that has no significance to the couple. 

Styling Tools

1 - Dental Wax - If you ever had braces you already know what I'm talking about. It's the wax that you stick on your braces to give your skin a break. This wax is also SUPER helpful styling wedding rings upright and securely for your photo. It also doesn't leave any residue or stains behind on the bands.

2 - Acrylic Blocks - I recently discovered this great tip from MaeMae & Co. - prop stylist extraordinaire. She recommended using these clear acrylic blocks as risers for your styling detail photos. They give you height and dimension and there is no color cast on to your boards. 

3 - Floral Frogs - These are also a new discovery and I'm so happy I found them. Flowers can leave stains on your styling boards or surfaces, especially if you do not scotch guard first and can ruin your boards (trust me!) but now that I have a few Floral Frogs in my kit, I'm no longer concerned. Florist have been using these for years to help create arrangements and now I can use them to prop up the flowers or bouquet for my photos keeping them dry and stain free.

4 - Rubber Hanger Grips - One of my biggest pet peeves is the wedding dress hanger itself. I would say 50% of my brides do not have a new hanger for their dress, so instead of using the ugly plastic white ones, I always bring a wooden hanger with notched ends to catch the dress straps. However, sometimes my Brides DO have a pretty hanger but there are no notches and this is where the Rubber Hanger Grips come in handy. They "grip" the smooth hanger creating a bit of friction for the dress straps to catch and you can hang the dress to photograph. They are self-adhesive and come in a pack of 100. 

5 - Removable Glue Dots - These are so helpful when you need to tack down a piece of paper of part of a flower in a specific location that you don’t want to move. These are removable and should not ruin your flat lay surfaces.

6 - Plastic Shims - Perfect for leveling paper especially envelopes in your flat lays.

7 - Stick-um - Another adhesive to help keep items in place. This Stick-um was intended to keep candles in place in their candlesticks but you can use this perfectly for styling larger items in your flat-lays such as welcome bag items.

8 - Pie Weights - Another great little item to level out small objects in your flat lay including flower petals and paper.

9 - Small Camera Level - It’s the perfect little level for your styling kit to make sure the paper is straight and aligned.


Want more Tea? One-on-One Coaching is now available! Find out more here!

Stay in the know! Subscribe to our newsletter, podcast, join our facebook group and be sure to follow @jainekershner on Instagram for the latest Tea with Jainé IG TV episode.

Greetabl Discount - Save 20% Greetabl and Greetabl Insider Pro. Use code JKERSHNER at check out.

Interested in collaborating? Please fill out our contact page and say hello!

Top 3 Wedding Photography Software Recommendations

Saving time means that your are saving money and I'm all about saving money, especially when it comes to your business!! Over the years, I have discovered some amazing software applications that have significantly sped up my wedding photography workflow and I wanted to share my top three resources with you. I hope they help you in your business or spark an idea on how to streamline your own workflow!

WeddingPhotographySoftwareMustHaves.jpg

No. 1 - 17 Hats (Client Management Software) I put off upgrading my "system" of how I managed my clients for a long, long time. How long? Embarrassing long! I was using several different apps from Apple (iCal, Mail, Notes, Pages and Numbers) to keep track of my inquires, weddings, booked sessions, invoices and expenses. It was becoming very overwhelming and I would wake up in a panic because I wasn't sure if I had crossed all my "T's" and dotted all my "I's". With a in-depth demo from one of my closest friends, I began to see the light and 17 Hats was about to become my main squeeze. I decided to tackle setting up my client management software in January (a relatively slow time for wedding photographers) so I wouldn't be rushed or in the middle of a deadline. I watched several "how-to" video's, made some emergency texts to my friend, and within two weeks, I was ready to go. I easily integrated 17 Hats Leads Form into my website and I can now track all of my new inquires. I created several workflows for each type of session I photograph and setup my calendar to sync with my iCal (sorry, Apple, I can't quit you ;) My questionnaire's are finally easy to use and I can eventually use 17 Hats for my invoicing and billing but I'm not there just yet. Baby steps... 17 Hats has made my life so much easier and way more efficient that I want to kick myself for taking so long to do it. So, take my advice, if you have more than 5 weddings a year, offer mini-sessions, photograph a ton of families, look into a CRM that is right for you! 17 Hats was the easiest for me to setup myself. I tried Tavé (too difficult) and I've heard wonderful things about Dubsabo. I should mention that 17 Hats is not perfect and missing some features from their competitors BUT they are implementing reporting soon, which is really my biggest complaint. However, you can easily export your data and make your own reports using a pivot table (PIVOT! Hello Ross Gellar Fans ;) so for myself, it wasn't a deal breaker. I signed up at the end of the year with a full two year subscription when they were running a promotion which saved me money! Oh, and if you use my referral link, you will save 10% OFF your year subscription.

No. 2 - Planoly - Oh, how I love Planoly, let me count the ways! Instagram is one of the biggest and best tools for my business. It's how I get my work out there the fastest, interact with clients, vendors, viewers and just about ALL of my couples. However, using Instagram can feel like a full time job and figuring out your grid layout can become challenging. It's a visual tool so it really does need to look visually pleasing. Enter Planoly! A cloud based visual planner for Instagram. It's amazing and so easy to use. It's a paid service ($84 per year) and you can schedule, plan, and post all of your images. Recently, Instagram allowed third-party applications, such as Planoly, access to Auto-Post images directly to your feed without your approval. For me, this was a game changer! I love being able to schedule & auto-post my images in advance. I do, however, have to go back in and tag images with locations, vendors, and clients because you cannot automate that process but since I'm on Instagram every single day (let's be honest!) it's not a big deal. There are other Instagram programs you could use - Later is free - but it's really what works best for you. Also, you can use several of Planoly's other features such as shopping links, reporting and analytics. So fancy!!

No. 3 - Calendly - This might be one of my all time favorite applications ever! Calendly is a cloud based online scheduler and it rocks my world! Why do you need an online scheduler? Because scheduling phone calls with potential couples can take forever trying to find a date and time that works for everyone. It can also be very frustrating for the couple and I want to make things as easy as possible right from the beginning. By using Calendly, I send out a link to my calendar that has my availability for the next two weeks. Next, the Bride can easily see when they are available to chat and choose a date and time that works for them. Last, they click the time, book the appointment and I get an email confirmation - BOOM - we are all set!! I have to admit that once I implemented this system into my New Inquiry process my meeting rate increased 10 fold. The best part, Calendly is FREE for the first calendar. They offer upgrade features that you can pay for (email & text confirmations) or you can simply leave it as is with one event type and keep it free. 


Want more Tea? One-on-One Coaching is now available! Find out more here!

Stay in the know! Subscribe to our newsletter, podcast, join our facebook group and be sure to follow @jainekershner on Instagram for the latest Tea with Jainé IG TV episode.

Greetabl Discount - Save 20% Greetabl and Greetabl Insider Pro. Use code JKERSHNER at check out.

Interested in collaborating? Please fill out our contact page and say hello!

Top 3 Tips to Culling Wedding Photos Faster

It's true what they say about being a wedding photographer, it's 10% photographing weddings and 90% everything else. You spend a lot of time in front of the computer vs. behind the camera which can be frustrating. Over the course of my wedding photography career, I've picked up a few helpful tips and tricks on how to cull and edit my photos faster which I'm so excited to share with you! Here are my top 3 tips on how to cull your wedding photography faster.

CullingWeddingPhotosFaster.jpg

No. 1 - PHOTO MECHANICby CAMERA BITS - This is hands down my NUMBER ONE recommendation for ANY photographer who photographs events, weddings or simply takes a large amount of photos at one time. The magic of Photo Mechanic is that it processes your RAW files instantly and loads the previews on your screen faster than you can blink. This makes the process of selecting your best photos incredibly fast and efficient. If you were to import your photos using Adobe's Lightroom, you'd be sitting there waiting for the files to render before you could even start your cull. You'll be waiting a painfully long amount of time before you can even start to select your photos - it's incredibly slow. Photo Mechanic is 100% worth the financial investment because it will speed up your workflow by hours and you need that time to get back out there and photograph your clients!

No. 2 - SHUTTLExPRESS by CONTOUR DESIGN - I know, this looks a bit intimidating but trust me you will learn to love it. The ShuttleXpress is a keyboard extender with programable buttons to help speed up your workflow and edit as fast as possible. I used the ShuttleXpress with Photo Mechanic and Lightroom. Since it's a programmable device, you can set it up with multiple software profiles which is amazing! For culling in Photo Mechanic, I use the ShuttleXpress to pick (T key) my selects which saves me time and my hand from cramping up by using my keyboard. In Lightroom, I use the ShuttleXpress mostly in the Develop module to copy & paste my settings, crop and rotate images, pick and flag my photos and so much more. Using the ShuttleXpress allows me to use keep one hand on the mouse and the other on the ShuttleXpress without ever having to touch the keyboard. I never have to look down to find a key to use a keyboard shortcut, which slowly eats away at my editing time by taking my eyes off of my screen. I've been using this device for several years and by now, it's second nature to me. I simply cannot work without it. 

No. 3 - START BACKWARDS - This is a tip I picked up from another wedding photographer and think it's absolutely genius! For wedding photographers, the end of the wedding usually means reception photos. LOTS and LOTS of reception photos which may or may not be your favorite part of the day :) To quickly get through this section, I suggest starting at the end of the wedding and moving your way backwards through each part of the day. This will speed up your culling time and you'll also move into the ceremony, portraits, getting ready sections more quickly. Also, specifically for digital photographers, you might take a few shots until you are happy with the final photo, which means you might have 2-3 images before you get to the final shot. If you start backwards, you will see the best image FIRST and skip over the rejects so much faster. This is such a simple tip but has efficient impact on saving you time in your culling process.

I hope you found these tips helpful but I want to hear from you! What are some time saving tips you've discovered while culling your images? Please share in the comments below!


Want more Tea? One-on-One Coaching is now available! Find out more here!

Stay in the know! Subscribe to our newsletter, podcast, join our facebook group and be sure to follow @jainekershner on Instagram for the latest Tea with Jainé IG TV episode.

Greetabl Discount - Save 20% Greetabl and Greetabl Insider Pro. Use code JKERSHNER at check out.

Interested in collaborating? Please fill out our contact page and say hello!

Top 3 Tips on How to Find a Photography Mentor

When I announced on my Instagram stories that I was going to be starting my weekly "Tea with Jainé" series, I asked my viewers to direct message me questions that they were struggling with. One of the very first questions I received was "How Do I Find A Photography Mentor?" which is such a great topic to discuss!! It can be very overwhelming starting your own photography business. There are a lot of choices and financial decisions to be made such as "what hosting company should you use?, "what equipment should I buy?", and "where should I advertise?" and I found that having someone to help guide you is invaluable. For myself, my photography teacher became my mentor and I'm so grateful for the time and advice he has given to me over the years. But what if you didn't go to photography school? Or you don't know anyone who is successful wedding photographer? Well, I thought I'd share my top three tips on how to find a photography mentor that is right for you!

No. 1 - ASK - I would simply ask other wedding photographers you know if they are interested in being your mentor. Don't know anyone? Research the local photography groups in your area and join a few photography groups on Facebook specific to the type of photography you want to pursue. Maybe someone in the group is looking to give back to their community or maybe they want to start their own mentoring program and would love your feedback? You'll never know until you ask for help.

No. 2 - INQUIRE - I'm sure there is a photographer out there whom you admire and would LOVE to learn from. Well, why not email them as see if they are open to being your mentor? Maybe they don't have an official mentor program (just yet!) but you could always offer your time as an intern for their help and guidance in return. What's the worst they could say, no? No big deal - ask the next person on your list! Don't let the fear of rejection stop you from contacting those whom you admire. I'm sure they will be flattered to get your email in their inbox!

tip: please be sure to make it personal! whenever you are emailing someone, please be sure to use their first name "Hello Jainé" vs. "Hi," in the heading. To me, this immediately makes me think you aren't serious about asking for my help OR you are emailing every photographer in the area and cannot be bothered to fill out my name. Want to stand out? Fill out their name and make your note personal to them!

No. 3 - INVEST - Plenty of wedding photographers offer paid mentorships or mentor programs which can be a great investment for you and your business. I found a range of  mentorships are focused on learning how to use your camera and find your style. There are business focused mentorships all about streamlining your business and marketing plans. You name it, it's out there! The options are endless but I would do your homework and make sure you know exactly what you are getting before you invest your hard earned money in any type of mentorship. For me, I created my own mentoring program Tea-a-Tet in an 'Ask Me Anything' type of setting because I wanted it to be casual, relaxed and open environment. I believe having direct access to a professional wedding photography is invaluable to any type of photographer venturing out on their own.

I hope this was helpful and would love to hear your thoughts! Have you invested in a Mentor program? Are you still searching for your perfect match? Leave a comment below!


Want more Tea? One-on-One Coaching is now available! Find out more here!

Stay in the know! Subscribe to our newsletter, podcast, join our facebook group and be sure to follow @jainekershner on Instagram for the latest Tea with Jainé IG TV episode.

Greetabl Discount - Save 20% Greetabl and Greetabl Insider Pro. Use code JKERSHNER at check out.

Interested in collaborating? Please fill out our contact page and say hello!

Welcome to Tea with Jainé

Hello and welcome to my new blog, Tea with Jainé! What started out as weekly Instagram Story, where I share my knowledge about being a wedding photographer in New York City, has become a full blown blog where I can go into more detail and depth over each new topic I discuss. It's my hope that this becomes a place where you can sit back with a cup of tea (or coffee! it's just not for me ;) and learn something new about wedding photography and how to improve and grow your own business. Thank you for stopping by and I cannot wait to hear from you! xo - Jainé

Introducing Tea with Jainé

Want more Tea? One-on-One Coaching is now available! Find out more here!

Stay in the know! Subscribe to our newsletter, podcast, join our facebook group and be sure to follow @jainekershner on Instagram for the latest Tea with Jainé IG TV episode.

Greetabl Discount - Save 20% Greetabl and Greetabl Insider Pro. Use code JKERSHNER at check out.

Interested in collaborating? Please fill out our contact page and say hello!